Input text in pygame
Pygame live – day by day code
Get the code for my most recent pygame tutorial here
Github repository
https://github.com/formazione/pygame_days
1 https://youtu.be/wAKLVFMb7eE Move Sprite
2 https://youtu.be/rsBJgWqsoa4 collisions
3 https://youtu.be/J3k4-tqy_kM Ai enemy 1
4 https://youtu.be/vwYu9Eel9QM frame rate
6 https://youtu.be/UaPjKtuQyfA Enemy AI 2
7 https://youtu.be/ZuEc6gncGNs Images, movements
8 https://youtu.be/wobJoDgI0LQ Bullet 1
Pygame is a module that makes you create games with python using SDL 2.
First you install it from the comman line interface:
pip install pygame
On the Mac you may have to do
pip3 install pygame
A blank window
Design an empty window. On the screen surface everything will happen.
First import pygame
- then initialize it (pygame.init())
- create the screen main surface
- the clock is for the frame rate
- the infinite loop (it stops with the pygame.QUIT event)
- fills with a color every frame
- update screen
- put the frame rate to 60 udates per second
import pygame
import sys


pygame.init()
screen = pygame.display.set_mode((500,500)) # this is the main surface where sprites are shown every frame
clock = pygame.time.Clock() # this is needed to limit frame rate (to 60 in the last line)
# This loop goes on forever till you quit with the x button of the window
while True:
	for event in pygame.event.get():
		if event.type == pygame. QUIT: # this makes the window quit clicking the x button
			pygame.quit()
			sys.exit()
	screen.fill((200,30,30)) # fills the screen with this color every frame
	pygame.display.update()
	clock.tick(60)
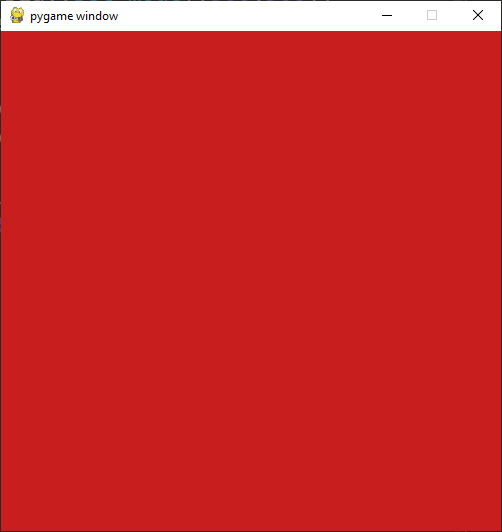
The screen is the main surface that will show all the game scenes.
The clock is for the frame rate (to limit it to 60 frames per seconds).
We colored the screen with the fill method (the color is RGB format, red, green and blue from 0 to 255)
After some initialization and definition of the screen and the clock, we start a forever loop (while True) to make things going on on the screen. For the moment we are just coloring the screen of red every frame.
1 – How to make windows and surfaces
The screen surface is the main one onto which you will blit (show) images, sprites and … surfaces. Screen is the main surface and other surfaces will be put onto it to show them, to move them in order to rapresent something or make a game. Let’s soon see how to make a window. Go to the link below to see the video about this themes.
This code will show a little red square in a window.
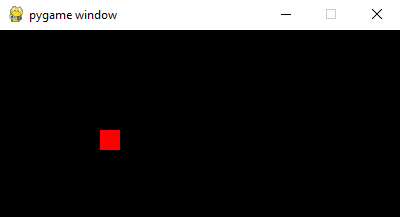
import pygame


pygame.init()

screen = pygame.display.set_mode((400, 600))
square = pygame.Surface((20, 20))
square.fill((255, 0, 0))
while True:
    screen.blit(square, (100, 100))
    if pygame.event.get(pygame.QUIT):
        break
    pygame.display.update()

pygame.quit()

# https://pythonprogramming.altervista.org/pygame-tutorial-n-1/
Let’s make this square move
The link to the video tutorial: here.
import pygame


pygame.init()
# ==================== the screen surface ===================
screen = pygame.display.set_mode((400, 400)) # window
width, height = screen.get_size()
clock = pygame.time.Clock()

# ============== the player (a little surface) ==============
square = pygame.Surface((20, 20))
square.fill((255, 0, 0))

w, h = 100, 100 # inital position of the player (square)
# directions
right, left, up, down = 0, 0, 0, 0
speed = 5
# Infinite loop ======== Game loop ========================
while True:
    if left and w > 0:
            w -= speed
    elif right and w < width - 20:
            w += speed
    elif up and h > 0:
        h -= speed
    elif down and h < width - 20:
        h += speed
    screen.fill(0) # clear screen
    screen.blit(square, (w, h))
    # close button
    if pygame.event.get(pygame.QUIT):
        break
    for event in pygame.event.get():
        # key pressed
        if event.type == pygame.KEYDOWN:
            if event.key == pygame.K_RIGHT:
                right, left, up, down = 1, 0, 0, 0
            elif event.key == pygame.K_LEFT:
                right, left, up, down = 0, 1, 0, 0
            elif event.key == pygame.K_UP:
                right, left, up, down = 0, 0, 1, 0
            elif event.key == pygame.K_DOWN:
                right, left, up, down = 0, 0, 0, 1
        if event.type == pygame.KEYUP:
            right, left, up, down = 0, 0, 0, 0

    clock.tick(60)
    pygame.display.update()

pygame.quit()
2 – Images and background
This time we will blit images on the background, together with simple colored surfaces and we will also color the background of the main surface that can be useful to clear the screen during a game.
Unsing the show function, the image will be displayed. If you call it with 1 as parameter (show(1)), the image will ne stretched to fit the size of the screen.
Get the code here https://github.com/formazione/pygame_live
import pygame

# SCALE AN IMAGE TO FIT THE SCREEN

pygame.init()

def show(fit=0):
    ''' use show(1) to fit the screen '''
    screen = pygame.display.set_mode((600, 500))
    bg = pygame.image.load("image.png").convert_alpha()
    sw, sh = screen.get_size()
    if fit:
        screen.blit(pygame.transform.scale(bg, (sw, sh)),(0, 0))
    else:
        screen.blit(bg,(0, 0))
    while True:
        if pygame.event.get(pygame.QUIT):
            break
        pygame.display.update()
    pygame.quit()

show(1)
3.1 Scaling surfaces
import pygame

# SCALE AN IMAGE TO FIT THE SCREEN

pygame.init()

screen = pygame.display.set_mode((600, 500))
bg = pygame.image.load("image.png").convert_alpha()
sw, sh = screen.get_size()
while True:
    screen.blit(pygame.transform.scale(bg, (sw, sh)),(0, 0))
    if pygame.event.get(pygame.QUIT):
        break
    pygame.display.update()
pygame.quit()
Bonus part 1: Grab a part of a surface with subsurface
This is about grabbing a part of the screen and I used for Puzzlemania game (the github repo).
Read this good article about pygame sprites.
3.2 – Move the sprite
Finally something’s moving: the sprite. The most simple way to do it is here:
3.3 – Animate and move (flip image)
This time the cat will animate. Just the idle position for the moment.
4. Multiple animation on a single sprite
Here we will try different animations for a single sprite and also a way to modify the speed of the animation. Still a very basic sprite class and no connections with pygame.sprite.Sprite, but that will come soon.
Bonus part 3: grouping sprites
5. Still on movements and animations
Let’s change the way we moved our sprite in the previous lessons.
Bonus: rotating image without losing quality
Bonus 5: perfect collisions
Kill sprites
See how to kill a sprite when goes out of the screen.
Showing a Text widget
Making buttons in pygame
How to create buttons for Pygame 29.8.2021
Practical examples: making flappy bird
Flappy bird how to make it part 1
Flappy bird, how to make it, part II: animation
Flap.py with pygame part 5
Create a clickable label (or a button) with pygame
A button with pygame
import pygame

pygame.init()
screen = pygame.display.set_mode((600, 400))

def button(screen, position, text):
    font = pygame.font.SysFont("Arial", 50)
    text_render = font.render(text, 1, (255, 0, 0))
    x, y, w , h = text_render.get_rect()
    x, y = position
    pygame.draw.line(screen, (150, 150, 150), (x, y), (x + w , y), 5)
    pygame.draw.line(screen, (150, 150, 150), (x, y - 2), (x, y + h), 5)
    pygame.draw.line(screen, (50, 50, 50), (x, y + h), (x + w , y + h), 5)
    pygame.draw.line(screen, (50, 50, 50), (x + w , y+h), [x + w , y], 5)
    pygame.draw.rect(screen, (100, 100, 100), (x, y, w , h))
    return screen.blit(text_render, (x, y))

def start():
    print("Ok, let's go")

def menu():
    """ This is the menu that waits you to click the s key to start """
    b1 = button(screen, (400, 300), "Quit")
    b2 = button(screen, (500, 300), "Start")
    while True:
        for event in pygame.event.get():
            if (event.type == pygame.QUIT):
                pygame.quit()
            if event.type == pygame.KEYDOWN:
                if event.key == pygame.K_ESCAPE:
                    pygame.quit()
                key_to_start = event.key == pygame.K_s or event.key == pygame.K_RIGHT or event.key == pygame.K_UP
                if key_to_start:
                    start()
            if event.type == pygame.MOUSEBUTTONDOWN:
                if b1.collidepoint(pygame.mouse.get_pos()):
                    pygame.quit()
                elif b2.collidepoint(pygame.mouse.get_pos()):
                    start()
        pygame.display.update()
    pygame.quit()

menu()
Create a map editor and a game that uses the map created
Particles
 Subscribe to the newsletter for updates
 Tkinter templates
Twitter: @pythonprogrammi - python_pygame
Videos
Speech recognition gamePygame's Platform Game
