In this first part we will see how to build an app to resize images. The app will be very basic, just to show a practical application of tkinter and Python.
Where those lines of code at the beginning come
This will take the code that we’ve seen in another post to make covers for Youtube with the PIL module, so I invite you to read that one before you watch this video below, if you do not get immediately the first lines of code. I am going to use a function that i made for that purpose to create an app with a GUI (graphic user interface) that makes easier to resize images. We will see the images in a folder and then we can select an image and resize them clicking a button. Nothin’ too fancy, but useful to get a little into the way tkinter works to make a little more easy to use the function (shrink), withount having to change the code of the app everytime we want to resize an image.
Import
We need to import Image form PIL, for images, tkinter for the GUI and glob to search files
- from PIL import Image
- import tkinter as tk
- import glob
from PIL import Image
import tkinter as tk
import glob
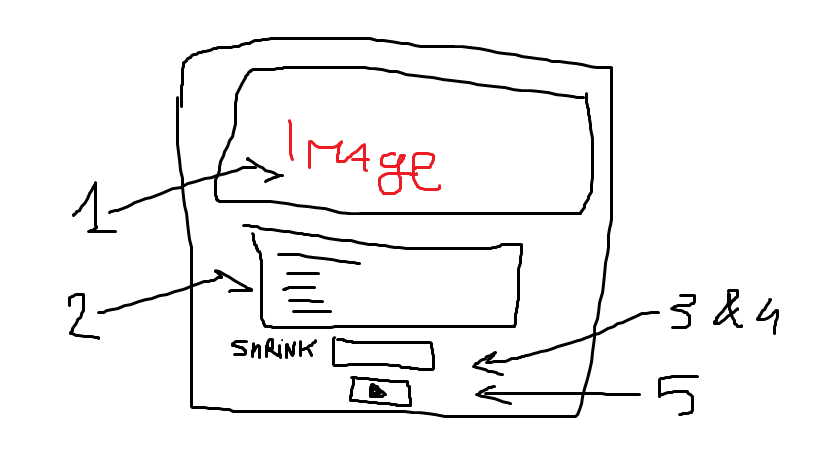
Then we will create a class that will create a window with the widgets for an image, the list of images in the folder, an entry for the shrink ratio (how much we want to make the image smaller… or bigger) and a button to do the action.
The image in the label
After we created a window and a frame
class Resize:
    def __init__(
                self,image="",
                shrink_ratio=2):

        self.image = image
        self.root = tk.Tk()
        self.root.title("Shrink")
        self.frame = tk.Frame(self.root)
        self.frame.pack()
we do create a label with the image passed to the class Resize
        self.img = tk.PhotoImage(file=self.image)
        self.label = tk.Label(self.root, image=self.img)
        self.label.pack()
I think it’s a good idea to put a label below the image in wich we will show the name of the image, the size and the with and height of it.
        self.lab1 = tk.Label(self.root)
        self.lab1['text'] = "..."
        self.lab1.pack()
At the moment we do not write anything, until something is selected in the listbox below:
        self.listbox = tk.Listbox(self.root)
        self.listbox.pack(fill=tk.BOTH)
Before we make the listbox visible, we populate it with the files in the folder with the glob function
        for file in glob.glob("*.png"):
            self.listbox.insert(0, file)
        self.lab2 = tk.Label(self.root, text="Insert ratio to shrink image (2=50%)")
        self.lab2.pack()
Finally we add the entry widget that will tell how much we will resize the image. We must add a button to save the file resized.
        self.entry = tk.Entry(self.root)
        self.entry.pack()
        self.root.mainloop()
When we will see the entire code
This is just the first part, where we place the tkinter widgets in the window. In the second part we will see how to make the GUI interact with the user to do the job. It will probably be onlilne for the 18/07/2019.
The code until now
from PIL import Image
import tkinter as tk
import glob

class Resize:
    def __init__(
                self,image="",
                shrink_ratio=2):

        self.image = image
        self.root = tk.Tk()
        self.root.title("Shrink")
        self.frame = tk.Frame(self.root)
        self.frame.pack()
        self.img = tk.PhotoImage(file=self.image)
        self.label = tk.Label(self.root, image=self.img)
        self.label.pack()
        self.lab1 = tk.Label(self.root)
        self.lab1['text'] = "..."
        self.lab1.pack()
        self.listbox = tk.Listbox(self.root)
        self.listbox.pack(fill=tk.BOTH)
        for file in glob.glob("*.png"):
            self.listbox.insert(0, file)
        self.lab2 = tk.Label(self.root, text="Insert ratio to shrink image (2=50%)")
        self.lab2.pack()
        self.entry = tk.Entry(self.root)
        self.entry.pack()
        self.root.mainloop()


app = GUI(image = "h:\\jupyter\\covermaker\\imgs\\python_big.png",
            shrink_ratio = 2)
The output window
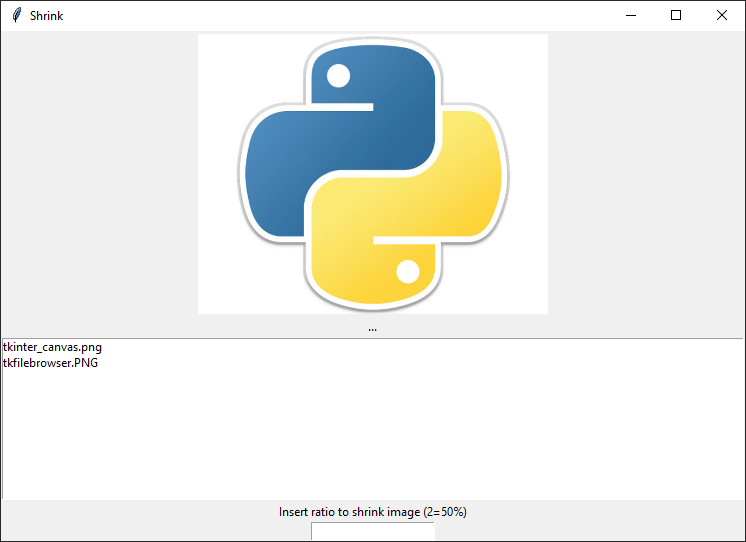
To be continued…
The app is a spin off of this code: Make a cover image with Python
A different project. While I am doing this post, I am using the following code to make covers. I just mentioned this in another post, but I want to show you a way to make a script that does not use a GUI. This has always the shrink function inside of it.
If you do not want to use a GUI, I have this code that is pretty easy to modify, even if there is no GUI, and I think it is not too unconfortable to read.
from PIL import Image, ImageFont, ImageDraw
import os

class App:
    size = 600, 400
    background = ("darkred")
    img = "logo.png"
    shrink = 2 # use this in case you need to resize the image in the middle
    fnt = "arial", 38
    title = "Images in Powerpoint\n with Python"
    subtitle = "The module python-pptx"
    filename = "output\\" + img[:-4] + "_cover.png" # do not need to change this

fnt = ImageFont.truetype(App.fnt[0], App.fnt[1])
fnt2 = ImageFont.truetype("arial", 28)
img = Image.new("RGB", (App.size), color=App.background)

def shrink(link, ratio=2):
    img = Image.open(link)
    w,h = img.size
    w = w // ratio # 2 is 50%
    h = h // ratio
    img = img.resize((w,h), Image.ANTIALIAS)
    return img

def middle(img, m=2):
    return App.size[0] // m -img.size[0] // m, App.size[1] // 2 - img.size[1] // 4


img_middle = shrink(App.img, App.shrink)
draw = ImageDraw.Draw(img)
title = App.title
subtitle = App.subtitle
draw.text((48,30), title, font=fnt)
draw.text((50,115), subtitle, font=fnt2)
half4 = (middle(img_middle,2))
img.paste(img_middle, half4, img_middle)
img.save(App.filename)
img.show()
The output
I used the output for a cover of my youtube video and a post on my blog pythonprogramming.altervista.org about powerpoint and python: