Here is the Point
Let’s see how to draw a pattern of points over an image.
The process
To make what we intend to do we are going to:
- create a new image
- add a color to it
- add the points
- save the image
The image, then, can be used as a background over which we can draw text and other images for our covers or banners and so on. Let’s do this.
Create a new image (in color)
from PIL import Image, ImageDraw
i = Image.new("RGB", (300,200), "coral")
And here is the output

Add some points to this one
To add the points, first you have to create an object ImageDraw.Draw that allows you to do it passing as argument the image “i” we just created, just in the way you see in the next line of code here below:
draw = ImageDraw.Draw(i)
Now, we can draw on top of the image with this istance (draw) and the method Point that takes the coordinates of the point on the image. Being the image 300 in width and 200 in height.
How the coordinates works
To get the size of the image you can use the size attribute of the img object that is a tuple with width as first value and height as second value. You can memorize them with w,h = img.size. The point 0,0 indicates the top left corner of the image. Watch the next image to get how the coordinates works.

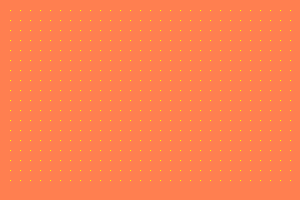
Let’s draw a lot of Points
With a couple of for loops we can now draw the points with a distance defined by the step variable. Change it to see how it affects the image.
# TAKE THE WIDTH AND HEIGHT OF THE IMAGE
from PIL import Image, ImageDraw
i = Image.new("RGB", (300,200), "coral")

draw = ImageDraw.Draw(i)
w, h = i.size
# DISTANCE AMONG POINTS
step = 10

for n in range(step,w,step):
    for x in range(step,h-step,step):
        draw.point((n,x), fill="yellow")
The resulting image is this
i.save("coralpoints.png")
Now we’re done. All we need to do is to create a function so that is more easy to change the values. See the next pdf to see how I made it or the code just below:
# COVERDOTS
"""
            Put some dots on the
            background image

            Giovanni Python
            23/07/2019

"""

from PIL import Image, ImageDraw

def bg(step=10, bg="darkred", fg="coral"):
    img = Image.new("RGB", (600,400), bg)
    w, h = img.size
    draw = ImageDraw.Draw(img)
    for n in range(step,w,step):
        for x in range(step,h,step):
            draw.point((n,x), fill=fg)
    return img


img = bg(step=12)
img.save("bgdots.png")
The output is this, an image 600×400, ready to be used as background for other images with other text above or other images for our post or blog, without having to use any program. This is the base for other type of images.

Let’s change the step parameter to step=6
… to be continued

Something blends
A little variation in the code with a new function: blend. If you give 2 images as argument followed by a number among 0 and 1, you will have the 2 images blended. The images must be of the same size.
from PIL import Image, ImageDraw

def bg(bg="green", fg="yellow", step=10):
    w, h = 600, 400
    img = Image.new("RGB", (w,h), bg)
    draw = ImageDraw.Draw(img)

    for n in range(step, w, step):
        for y in range(step, h, step):
          draw.point((n, y), fill=fg)
    return img

img = bg(bg="green", fg="blue",step=50)
img2 = bg(bg="white", fg="black",step=10)
img3 = Image.blend(img,img2,0.2)
img3.save("blended.png")

The video about the last code for PIL and points
Watch the video if you want to see the code about PIL and points while it has been written.