In the previous episodes:
- draw circle with mouse (starting with pygame)
- draw with mouse with pygame.mouse.get_pressed()(pygame draw app 2)
This was one output with the code of the last example:
Moving a sprite with arrow keys
This time, in this 3rd episode of Pygame, we will move a sprite with the arrow keys.
In the code we will
- import pygame
- create the screen with pygame.display.set((x,y))
- load the image
- create the loop to move the sprite
Live coding video with full code to move a sprite with Pygame
In this video I followed in part the code below and in part I tried something new to make the sprite move with the mouse (I saved this part in this post too, after this code below). Let’s see how to make a sprite move.
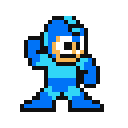
I used this image for the sprite:
import pygame
from pygame.locals import *

pygame.init()
clock = pygame.time.Clock()
size = 400, 300
screen = pygame.display.set_mode(size,0,32)
pygame.display.set_caption('GAME')
x, y = 200, 130

sprite=pygame.image.load('mega.gif')
loop = True
while loop:
    # this adds the sprite at every frame rate
    screen.blit(sprite,(x,y))

    for event in pygame.event.get():
        # this is to close the window
        if event.type==QUIT:
            loop = False
            #sys.exit() # this will close the kernel too
            # in development mode leave the comment above
    # this is the list with the keys being pressed
    keys = pygame.key.get_pressed()
    if keys[pygame.K_LEFT]:
        x -= 2
    if keys[pygame.K_RIGHT]:
        x += 2
    if keys[pygame.K_UP]:
        y -= 2
    if keys[pygame.K_DOWN]:
        y += 2
    # we update the screen at every frame
    pygame.display.flip()
    # if we put the frame rate at 60 the sprite will move slower
    clock.tick(120)

pygame.quit()
You can use png files and jpg also. There is a little ‘issue’ because there is a trace that the sprite will leave on the screen.
To avoid that effect, you need to clear the window before you blit the next sprite frame. You can do this adding, after the loop, before the sprite blit the following code:
screen.fill((0,0,0))
Watch the output in this video below:
Move the sprite with the mouse
We can also move the sprite with the mouse, just like we did for circles and rectangles in the previous post.
In this code you can see the screen.fill((0,0,0)) to avoid leaving traces on the screen like in the video below:

With the screen.fill((0,0,0)) this effect is avoided.
import pygame
from pygame.locals import *

pygame.init()
clock = pygame.time.Clock()
screen = pygame.display.set_mode((400,300), 0, 32)
pygame.display.set_caption("Game")
x, y = 200, 130
sprite = pygame.image.load("mega.gif")

loop = True
pygame.mouse.set_visible(False)
while loop:
	screen.fill((0,0,0))
	x, y = pygame.mouse.get_pos()
	screen.blit(sprite, (x-50,y-50))
	for event in pygame.event.get():
		if event.type == QUIT:
			loop = False
	pygame.display.flip()
	clock.tick(60)


pygame.quit()
This is how the sprite moves with the mouse:

Using Visual studio code with jupyter
As you can see in the video you can use jupyter with Visual studio code. This is great because you unite the versatility of jupyter with the confortable code editing in Visual Studio Code. You just need to use a python interpreter where you installed jupyter lab and put #%% before every cell. Then you can shift enter to run the code like in jupyter lab and you will se the output in a window on the right of the screen.
Look at this post where I talked about VSC and Jupyter.


Watch this video to see how: